SMA Inverter – EMS
This guide will show you how to connect the SMA Inverter to the EMS Panel. It will also take you through the setup and parameters required on the inverter to ensure communications to the EMS Panel are successful, to monitor and manage your device remotely.
Steps to follow:
- SMA Connection Setup.
- Configure the SMA Parameters through their WebUI.
- Continue with Cloud Setup.
Sizes of sites may vary from one inverter to many. This does not influence how you connect the inverter to the EMS panel itself. It means that you will need to connect one inverter to the next using Ethernet cable of Cat5e or better. The diagrams below will show you how this is done.
1. SMA Connection Setup
A. Connecting a single SMA Inverter to the EMS Panel.

- Wire SMA Inverter Port-B into either LAN 1, LAN 2, or LAN 3 on the EMS Panel.
B. Connecting Multiple SMA Inverters into the EMS Panel.
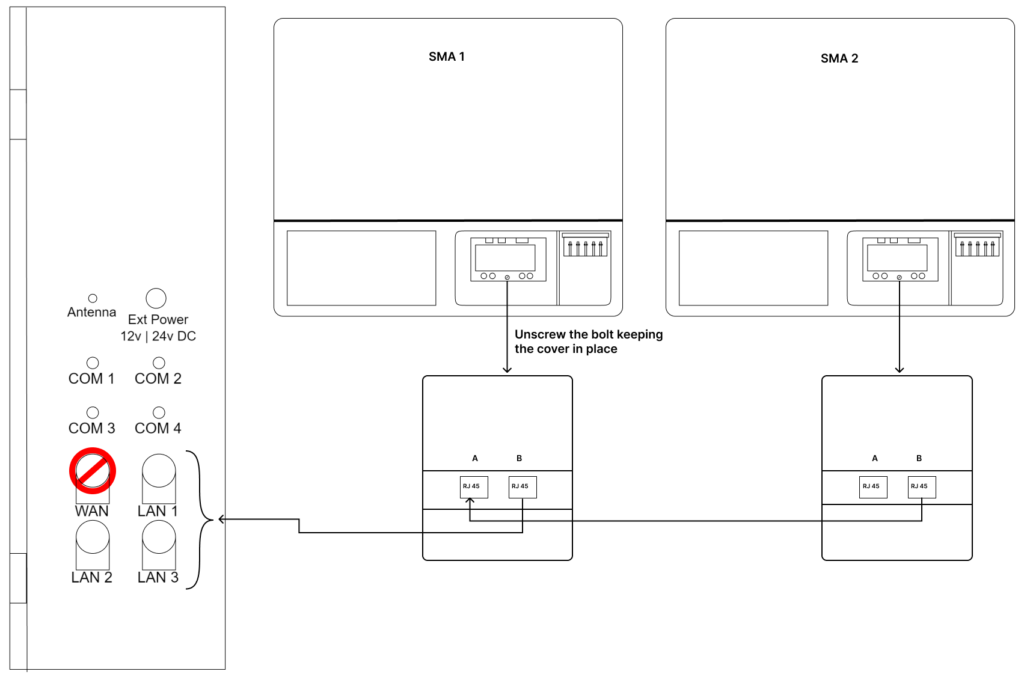
- Wire SMA Inverter 1 Port-A into Port-B of SMA Inverter 2.
- If you have more than two inverters, continue this pattern of Wiring A to B.
- Wire SMA Inverter 1 Port-B into either LAN 1, LAN 2 or LAN 3 on the EMS Panel.
2. Configure the SMA Parameters through their WebUI.
Ensuring the proper configuration of parameters on the SMA inverter is crucial for seamless control and monitoring via the EMS panel. These parameters are accessed and adjusted through the SMA’s WebUI. To begin, follow the outlined steps provided by SMA on their website for Access to the Inverter via the User Interface. Once logged in, navigate to the appropriate settings as detailed in Setting Static IP Addresses on SMA Inverters. With access to the user interface secured, proceed to configure the parameters outlined in the table below.
| Parameters | Info | Required Parameters |
| IP Address | Increment the final value by one for each additional inverter. | 192.168.35.76 |
| Subnet Mask | This will remain the same across all inverters. | 255.255.255.0 |
| Gateway IP | This will remain the same across all inverters. | 192.168.35.1 |
| DNS Server IP | This will remain the same across all inverters. | 8.8.8.8 |
3. Continue with Cloud Setup.
Now that you have successfully connected your device, you can continue to setting up the device on the cloud.